In today’s blog, we’ll be covering a short portion of one of the most versatile tools ever built for us Forensicators - Yara!

Yara is your one-stop solution to detect malware of any kind by only matching out a few characteristics. It works on ‘rules’ (we’ll discuss those later), which are written by thousands of analysts all over the world to detect and defend against some of the trickiest malware. This amazing tool was brought to us by Victor Alvarez of VirusTotal, which is yet another amazing resource in a defender’s toolkit.
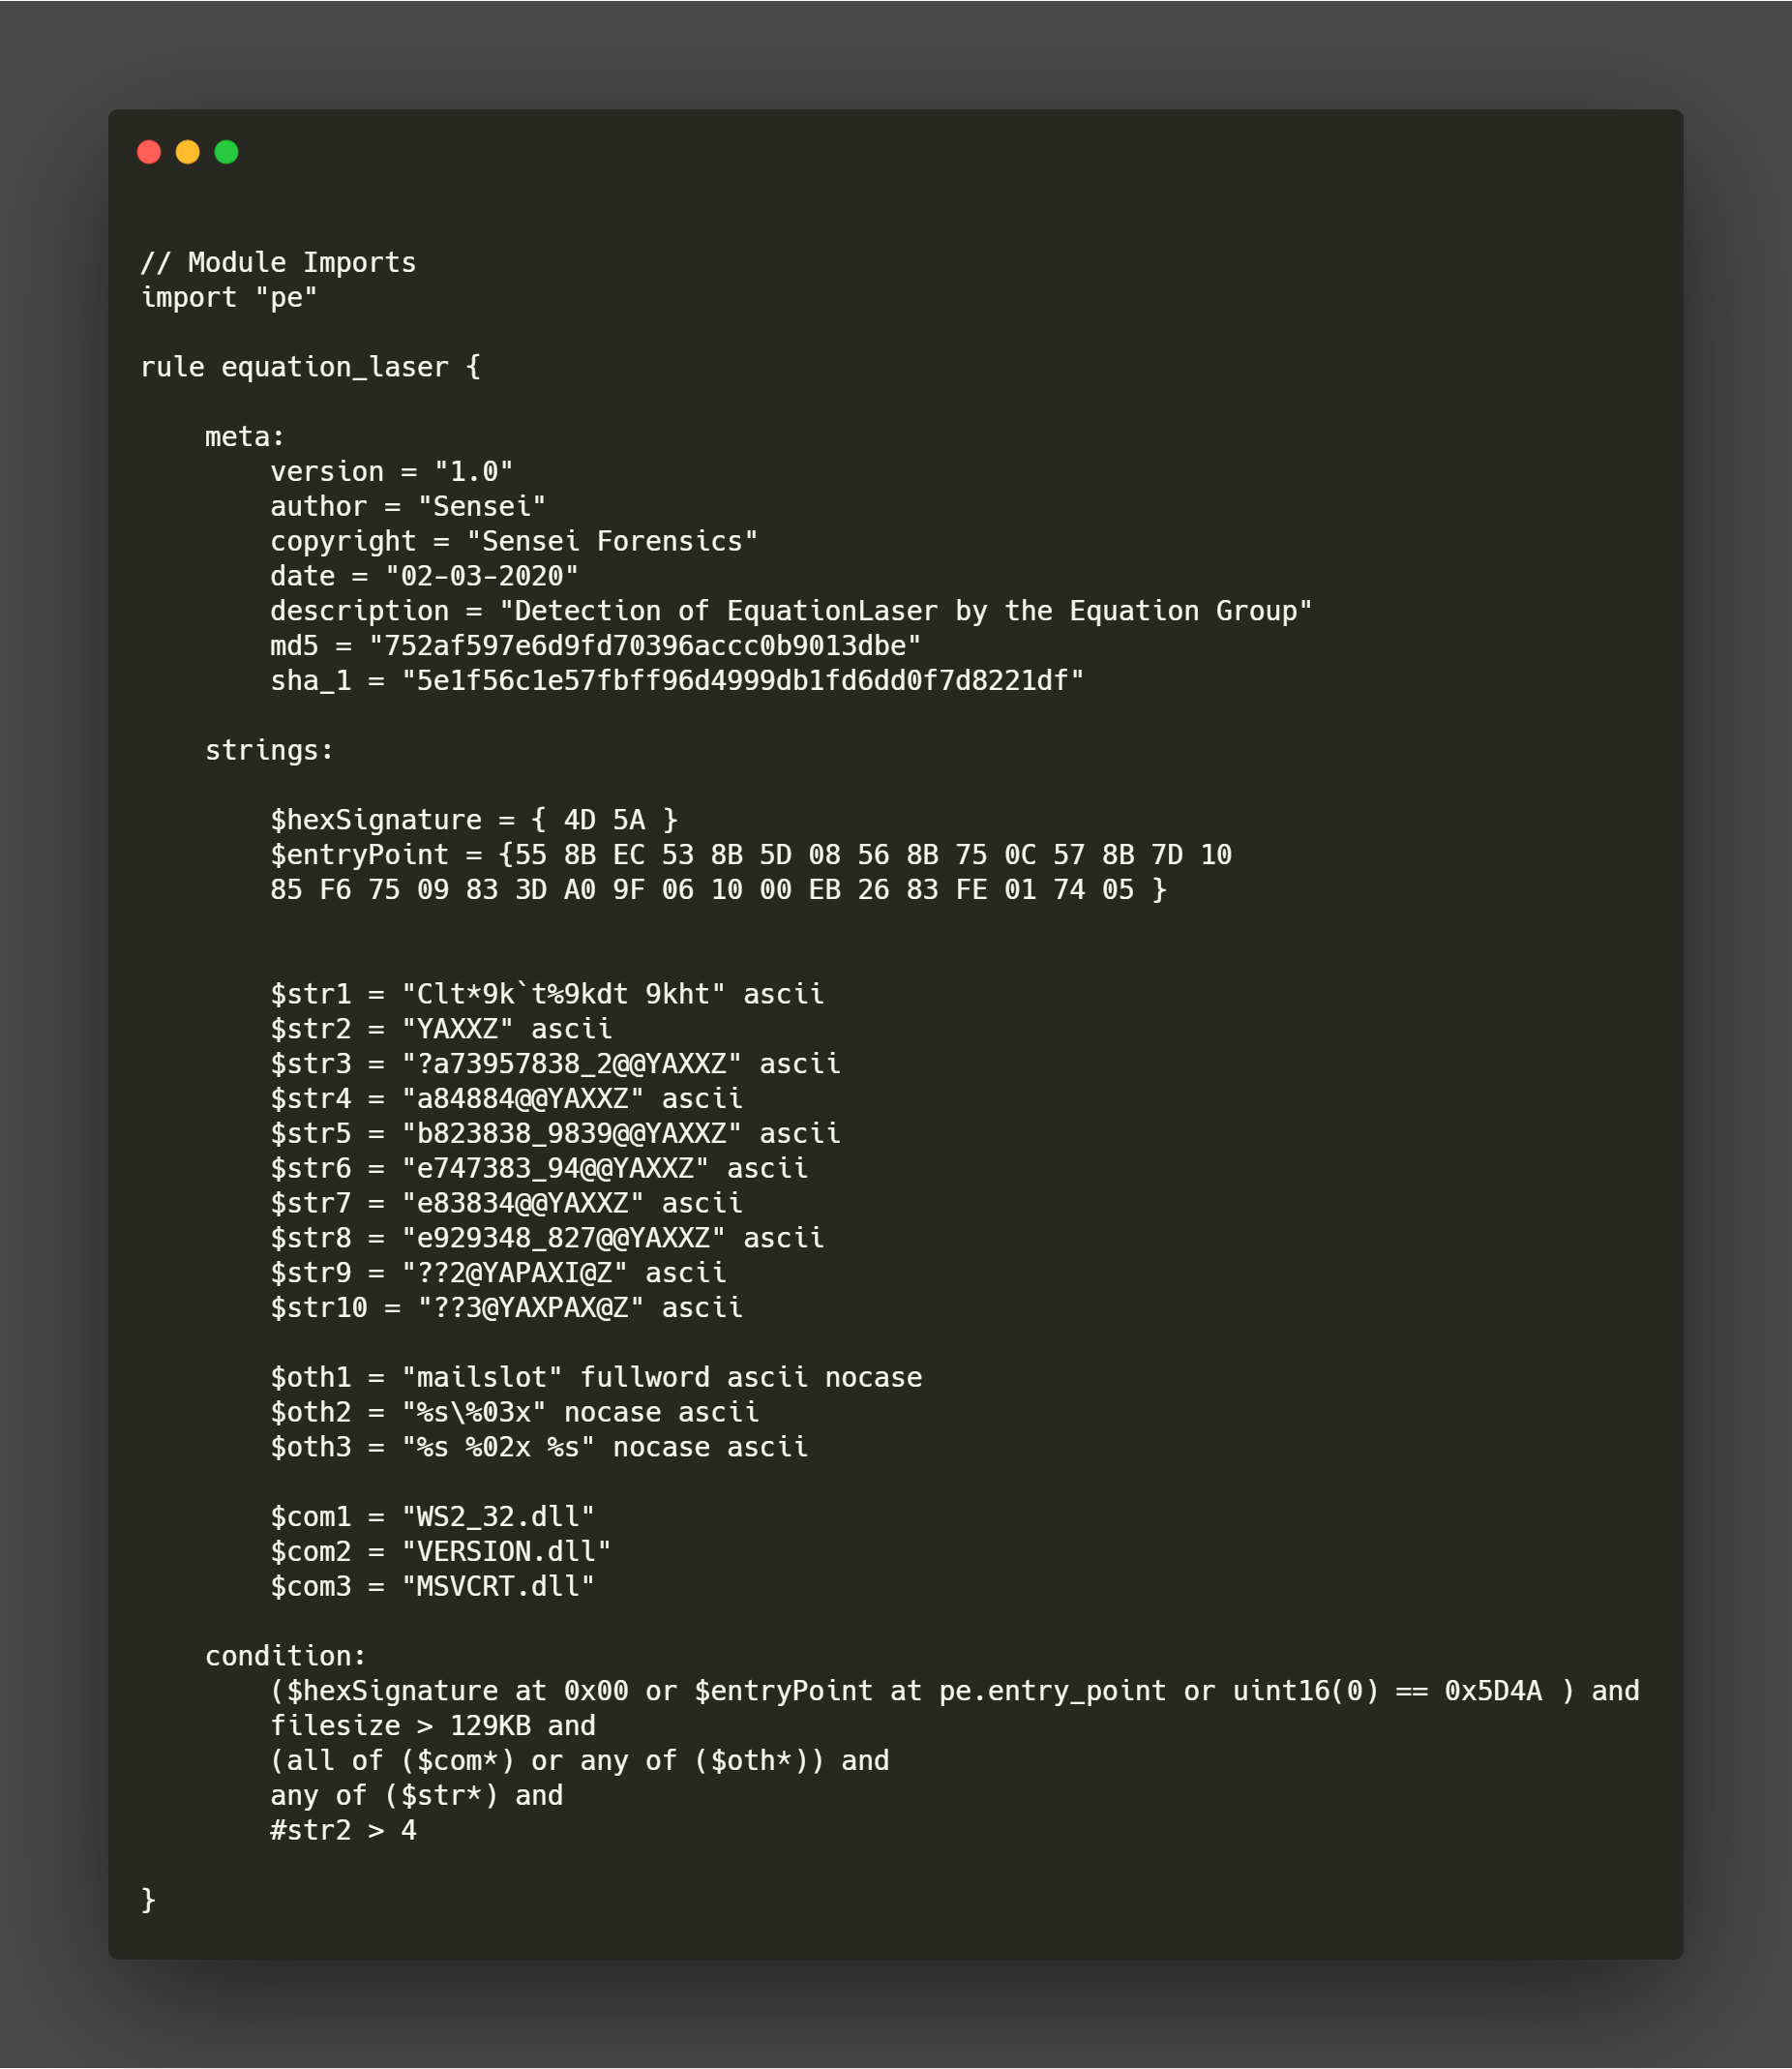
Here’s a sample Yara rule that I wrote a month ago to detect the Equation Group’s Equation Laser:
Interested in writing a Yara rule yourself? Let’s jump into it and discuss the basics of Yara so you can start scripting your rule and get some juicy detections going!
Rules
We’ve gone over this before - Yara uses what we can ‘rules’ to write characteristics of a program and then matches these very rules against your malwares. So, if there’s a match (let’s stay a string matches), the rule basically matches or detects the malware. It’s simple as that.
Have a look at this Yara rule:
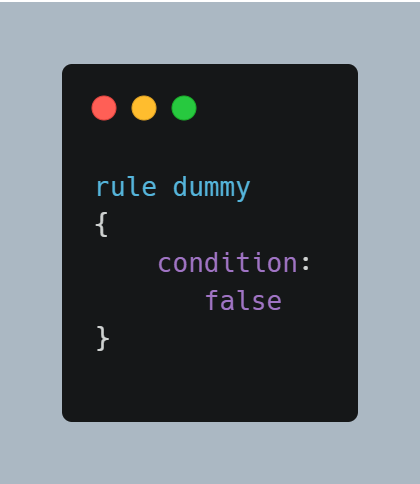
This is possibly the shortest Yara rule that actually works! It does nothing, but it works!
So, when you’re about to start writing your first Yara rule, you’re going to think of it’s Syntax. It has one mandatory section and two optional sections which you can use to constitute a rule. Confusing? We’ll discuss these sections in detail again.
Rule Identifiers
To start writing your rule, you’ll need a rule identifier. This small phrase, string, or text, identifies your rule amongst others. It doesn’t have to be unique but it should be meaningful. So, think of one meaningful name of your Yara rule and prepend it with the keyword rule. Now, it’s a rule. In our case, it was ‘dummy’ or ‘equation_laser’.
One quick disclaimer: You can only use an alphabet to start your rules’ name. It can’t be a digit. After the first letter, you may make use of alphabets, digits, and underscors. Make sure none of your phrases meet a Yara keyword (you’re treading illegal waters if you do so). Here’s a link to the keywords which are safeguarded by the Yara engine itself: yara-keywords.
‘meta’ Section
I discussed ‘sections’ before - they constitute your rules. ‘meta’ is an optional section which can help readers, analysts, and engineers read and understand what your rule is about, who actually wrote it, and what’s the piece of malware that your rule detects. The phrase ‘meta’ explains that - as this section holds information about the rule (or it’s owner) itself. Because of that, it can’t be used in other sections either (the cool sections which do the detections, comin’ in hot really soon!).
You can start a section by using its name and appending with with a colon. So, ‘meta:’ becomes a valid section. Now each section can have multiple values in it. In this section, they are called ‘meta-data identifiers’. Each identiifer will be followed by an equal sign and then a value which you can set. Feel free to use strings, boolean, or numeric values for your meta-data.
Take a look at my meta-data section.
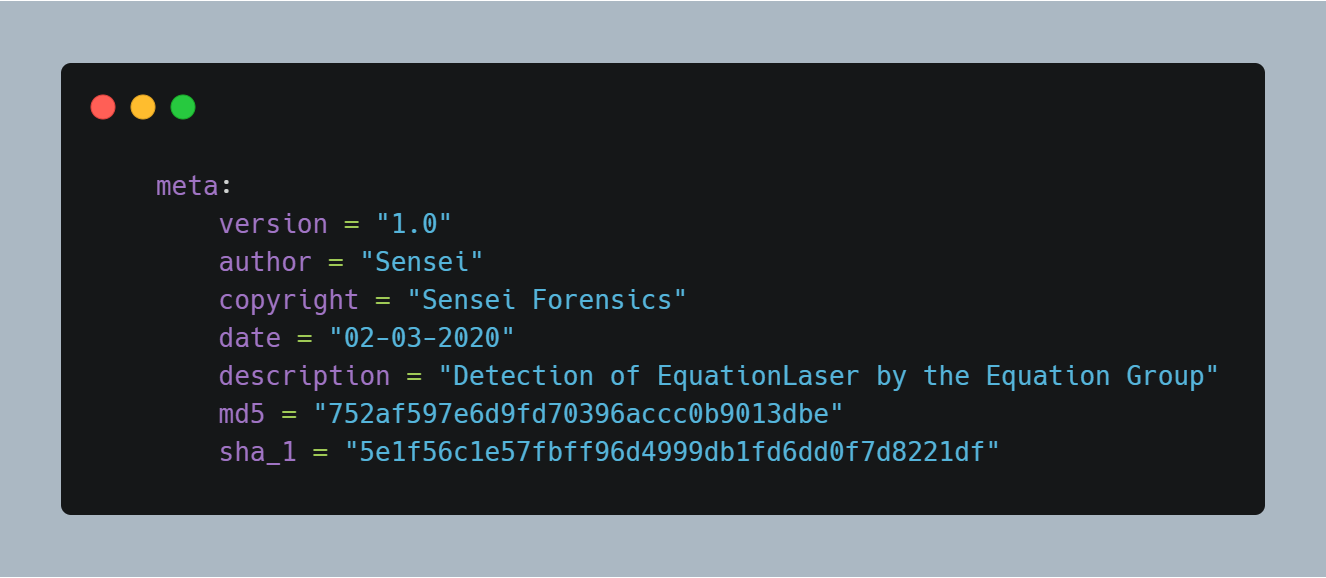
Apart from the personal information, I’ve also included the hashes of the malware files. So, now when an analyst checks my rule, he/she can quickly pull out the malware from well-known sources by using this hash. It can also be used to identify if they’re analyzing the same piece of malware or not (integrity check, my friends!).
‘condition’ and ‘strings’ Sections
Next, we’ll be discussing the ‘condition’ section. It is the only mandatory section you’ll be adding in to your rule. This section is also the most important as it helps you identify when your rule has actually identified a file as a particular malware (or the one under investigation).
All in all, it’s a boolean expression that’s going to be ‘True’ or ‘False’ based on the mentioned strings (that’s the last section, hold on). They can also contain logical and relational operators in between the various strings that you’re going to match. You can also import other rules and modules into your Yara rule and use them in your conditions section.
We’ll take a look at the ‘condition’ sections’ example after we’ve discussed the ‘strings’!
Remember how we were going to match some characteristics or strings from the malware? We need to mention them first, and match them later, in order to detect the malware. The ‘strings’ section is all about those!
This is where you’re going to define your strings, your hex signatures, and everything else you’ve identified as unique to the malware. Now, what types of strings can be matched from a file? Let’s see. Here’s that list:
- Hexa-decimal
- Text strings
- Regular expressions
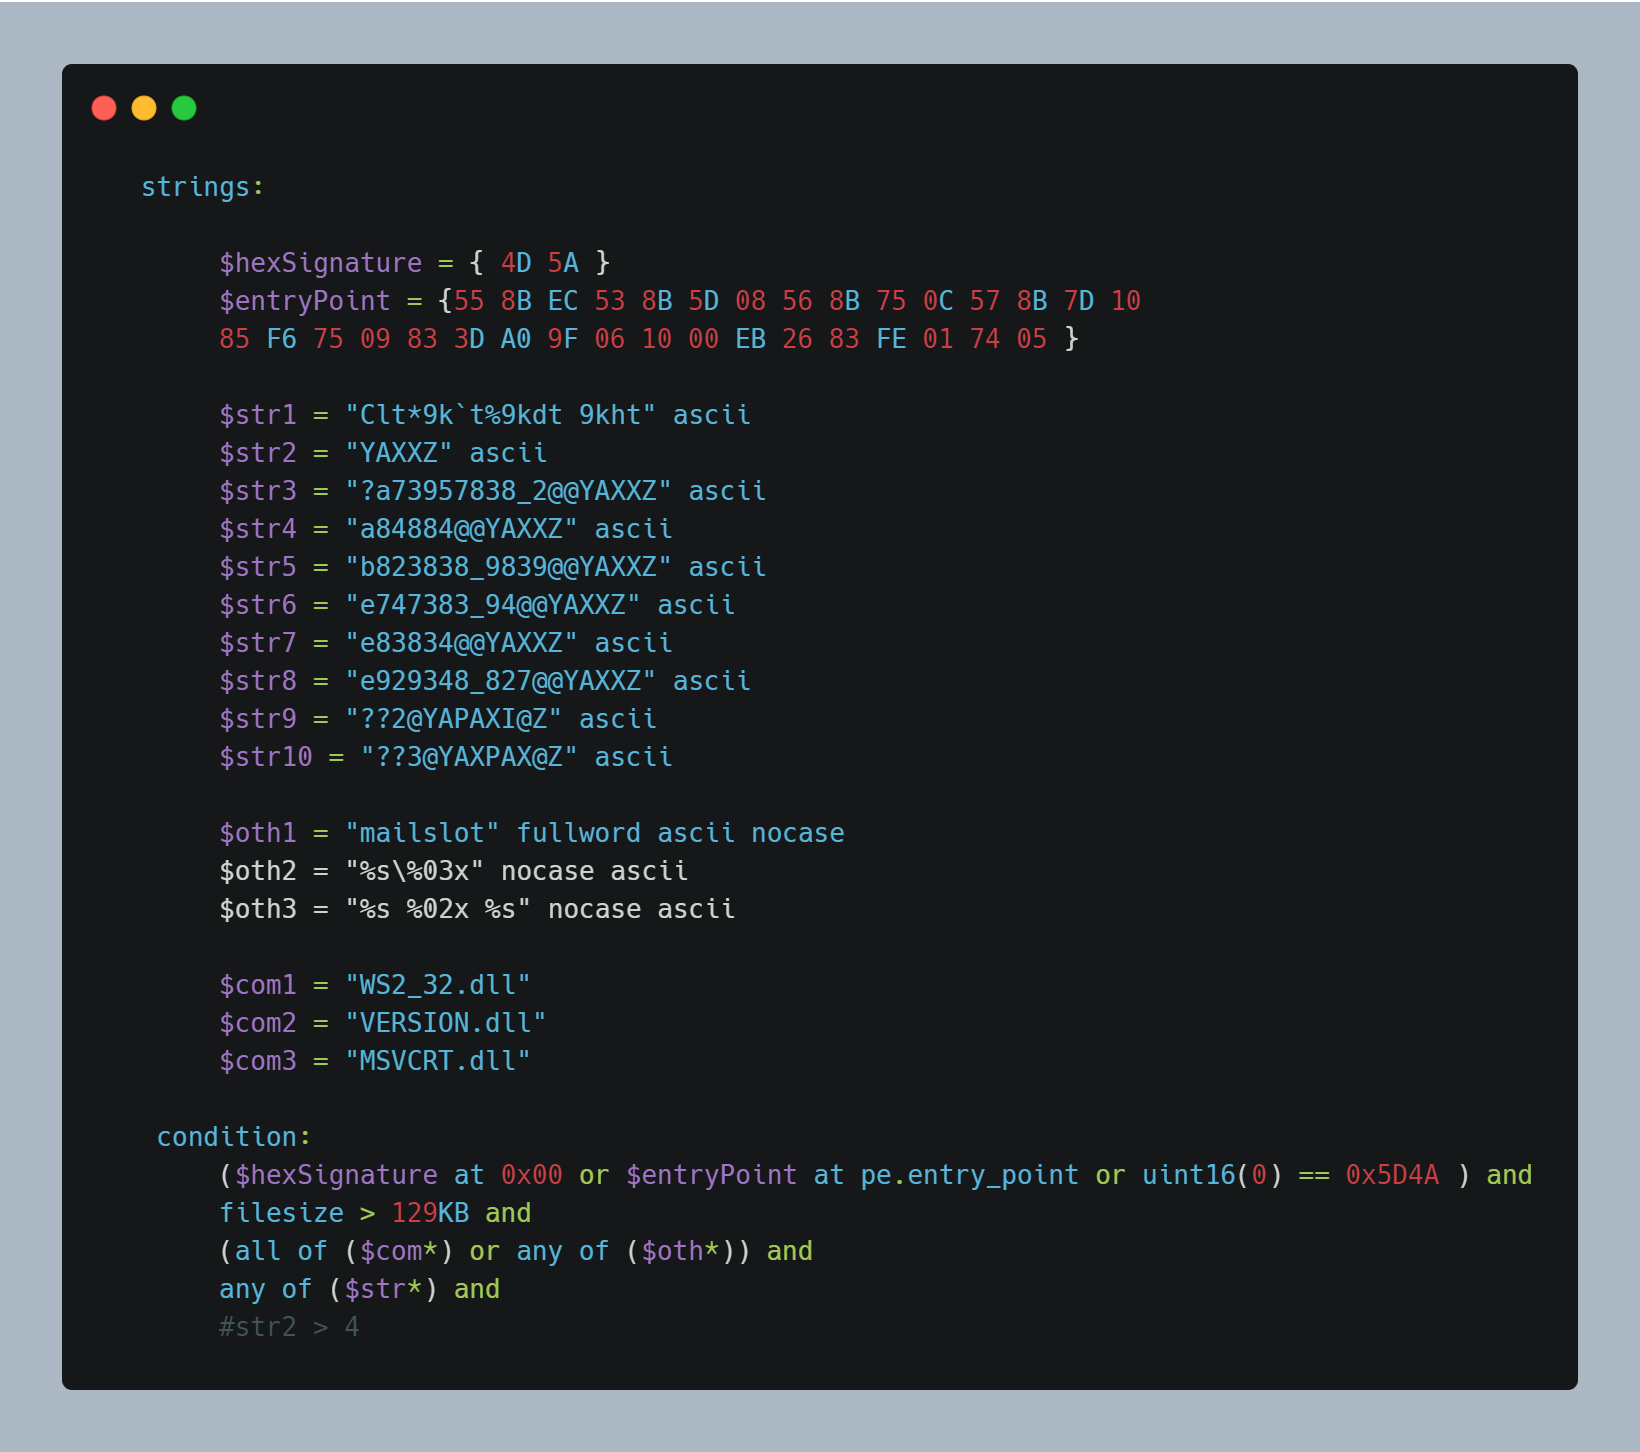
Finally, let’s discuss a sample ‘condition’ and ‘strings’ section:
Whew, that’s a bunch of stuff! There’s lots you can do with these types of strings as well. We’ll discuss some of them here, the rest we’ll be discussing in the second part of this blog!
Anyways, let’s discuss the material that’s required to understand this rule at the least. I’ll only be discussing the hexa-decimal and textual strings in this section. We’ll go over regular expressions in a later module.
Hexa-decimal Strings
First, let’s go over hexa-decimal strings:
Hexadecimal strings are composed of bytes (like the name suggests!). They’re also equipped with special constructions like wild-cards, jumps, and alternatives. Let’s say you only know a small section of the hex string. You can utilize wild-cards as placeholders to identify some sections and the rest can be anything random. For example, the placeholder character (?) can be used to substitute a nibble for any random hex value.
Here you have an example of a hexadecimal string with wild-cards:
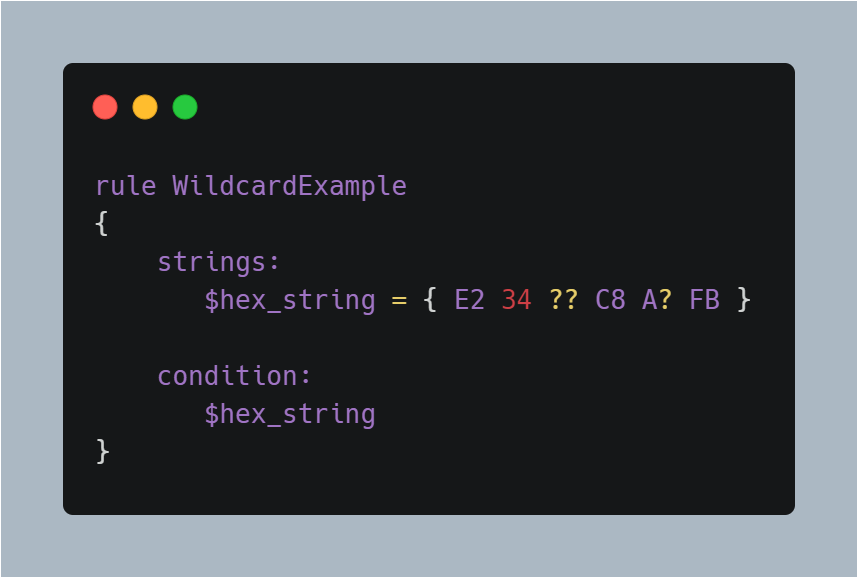
Now, I simply use a placeholder for a nibble here. But, what if you don’t know the length of the variable chunks? You can use ‘jumps’ in these cases instead of the wild-cards. They’re written with the square brackets, two digits, and a hyphen to separate them. So, if I wrote ‘[4-6]’, this means there can be 4 to 6 variable bytes (chunks) to match that particular string.
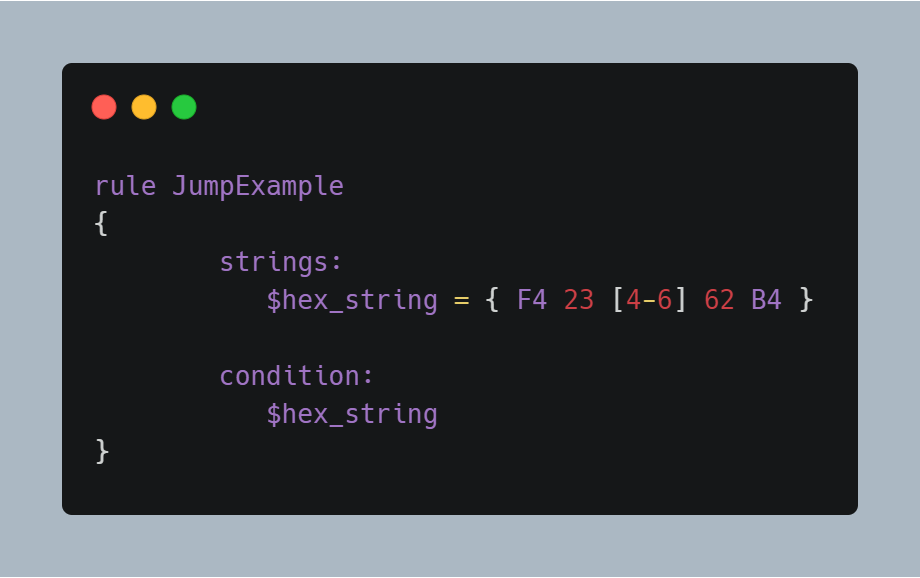
This jump is indicating that any arbitrary sequence from 4 to 6 bytes can occupy the position of the jump. Any of the following strings will match the pattern:
F4 23 01 02 03 04 62 B4 F4 23 00 00 00 00 00 62 B4 F4 23 15 82 A3 04 45 22 62 B4
Make sure your jumps are valid by utilizing the following rule: 0 <= X <= Y
These are valid jumps:
- FE 39 45 [0-8] 89 00
- FE 39 45 [23-45] 89 00
This is invalid:
- FE 39 45 [10-7] 89 00
If the lower and higher bounds are equal you can write a single number enclosed in brackets, like this:
- FE 39 45 [6] 89 00
The above string is equivalent to both of these:
- FE 39 45 [6-6] 89 00
- FE 39 45 ?? ?? ?? ?? ?? ?? 89 00
Let’s say you know know the starting limit or maybe you don’t know anything about the variable chunks. You can ignore the starting and ending limits in this case, or eliminate the ending limit. Here’s how:
- FE 39 45 [10-] 89 00
- FE 39 45 [-] 89 00
The first one is 10 to infinite bytes, whereas the second one can be zero to infinite bytes in between.
There are also cases when you’d like to match different alternatives in a variable chunk of your hex string.In that case, you can utilize round brackets and mention several values with ’|‘ to separate them. Here’s how:
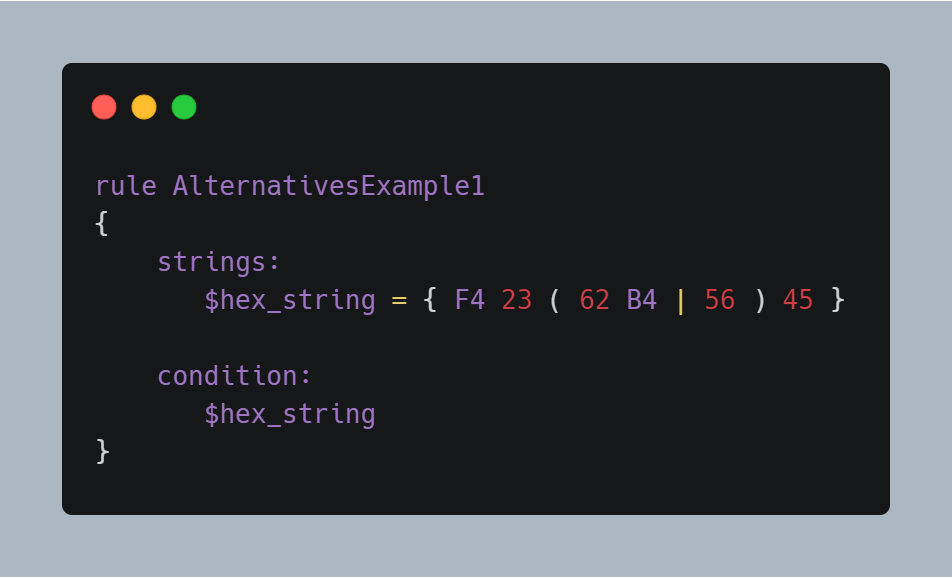
This rule will match any file containing F42362B445 or F4235645.
For more complex hexadecimal strings, you can combine the usage of wild-cards, jumps, and alternatives as well.
Textual Strings
Just like hex strings, you can use textual strings in your rules as well. It’s just as simple as before; here’s how:
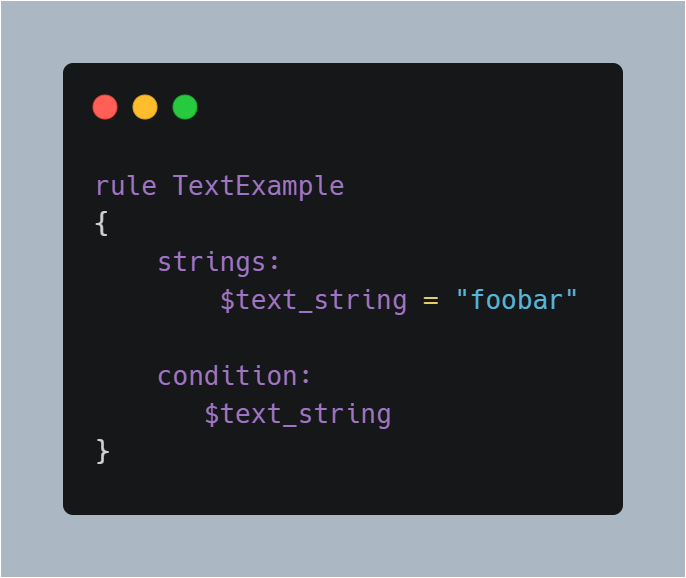
This ASCII string is the simplest case. You can also make use of modifiers to alter the way a string is interpreted. Here’s how you can add them to your strings:
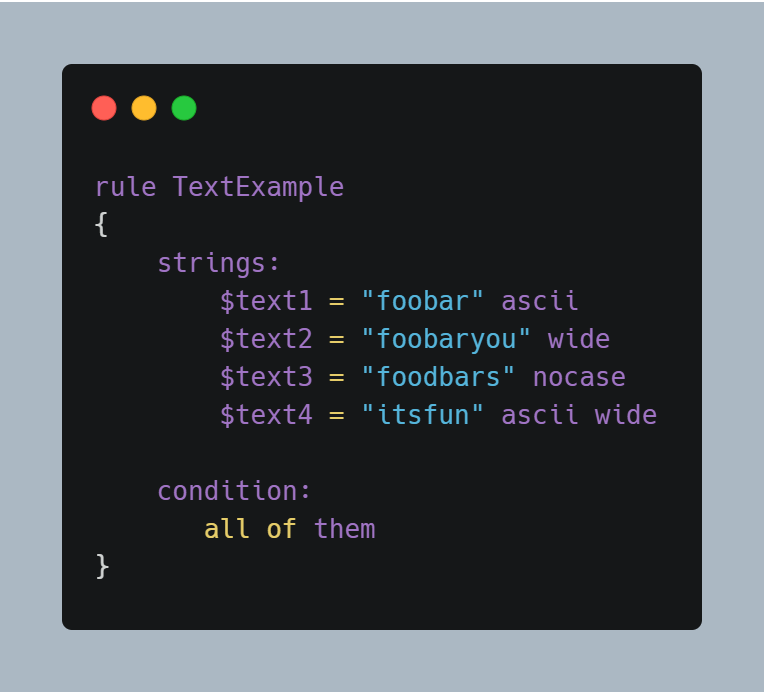
So, pick a modifier (we’ll discuss those) and add them to the end of your string. That’s it - you’re done!
Now, what are those modifiers and what do they do? Let’s see!
-
‘nocase’: Yara strings are case-sensitive by default. In order to change this behavior, you can use the ‘nocase’ modifier with your strings. So, whether it’s ‘foobar’, ‘FoObaR’, or anything else with this character set, it’ll match.
-
‘ascii’: All strings are defaulted to be ASCII encoded. So, whether or not you add this, it’ll search for an ASCII encoded string in your file.
-
‘wide’: Search for strings with two-bytes per character. It’s very common in executables (which you’ll be analyzing very often!). Now, if you were to search an ASCII-encoded string with this modifier, it will run. This modifier interleaves the ASCII codes of the characters with zeroes. If you want to search for strings in both ASCII and wide form, you can use the ascii modifier in conjunction with wide , no matter the order in which they appear.
-
‘fullword’: This modifier guarantees that the string will match only if it appears in the file delimited by non-alphanumeric characters. For example the string domain, if defined as fullword, doesn’t match www.mydomain.com but it matches www.my-domain.com and www.domain.com.
Each modifier can be used in conjunction as well. So, that opens up lots of cases for you to test!
One last thing before we end this section; text strings can also contain the following subset of the escape sequences available in the C language:
| \ “ | Double quote |
| \ | Backslash |
| \t | Horizontal tab |
| \n | New line |
| \xdd | Any byte in hexadecimal notation |
Revisiting the ‘condition’ section
That’s enough for the strings section for now. Let’s switch back to the ‘condition’ section now.
Firstly, conditions can contain relational and logical operators. So, these words are ‘keywords’ in Yara that you may use:
- Boolean Operators: and, or, not
- Relational Operators: >=, <=, <, >, ==, and !=
- Arithmetic Operators: +, -, *, \, %
- Bitwise operators: &, |, «, », ~, ^
If you’re going to use your strings in the conditions, they act as Boolean values. If their value is set/present/true, then the expression corresponds to true. Otherwise, it’s false.
Let’s say you’re also interesting in checking out, how many times is that string present in the file. You can prepend a ‘#’ (hash) with the string identifir in order to match it’s occurence with a numeric value. Here’s an example covering our last two discussions:
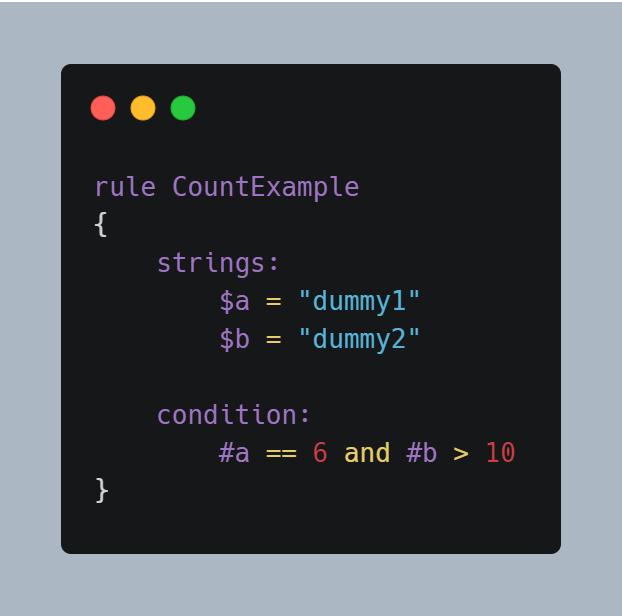
This rule matches any file or process containing the string $a exactly six times, and more than ten occurrences of string $b. In my rule, I’ve searched a string to be present in the file at-least 5 times (using a relational operator).
String identifiers aren’t the only variables available to you for usage. If you check my example out, I’ve used a special variable called ‘filesize’. The purpose of which is actually to return the file-size of the file being scanned. It’s value is available to you in bytes. Since it’s available in bytes, you can mention the file size in ‘KB’ or ‘MB’ with their values being multiplied by 1024 and 2 raised by 20, respectively.
Now, let’s say you found three sets of strings in your file and you wish to match these. But, for a malware from the same family, you found two strings matching. What you can do is, you may set the third string optional by modifying your conditions section. How? You can tell it to match two strings, all strings, or whatever number you want to match. Here’s how:
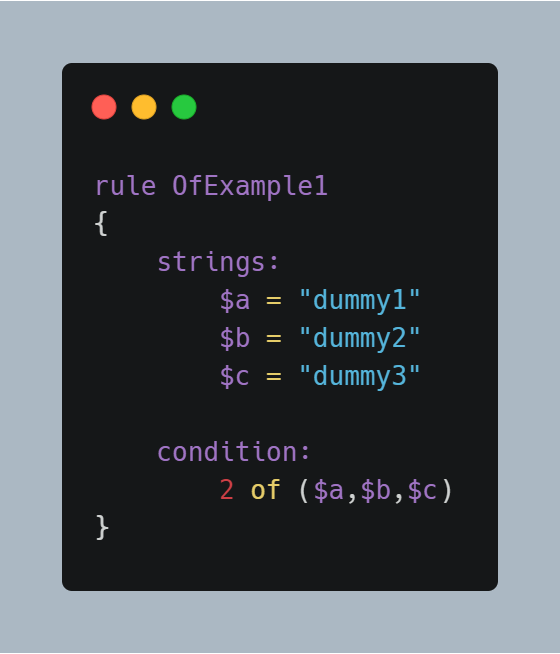
This rule requires that at least two of the strings in the set ($a,$b,$c) must be present in the file, but it does not matter which two. You can also make use of several other keywords. Here’s a summary:
| ($foo*) | Double quote |
| all of them | All the strings in the rule |
| all of ($a*) | All strings starting with ‘a’ and ending with anything |
| any of them | Any single string in the rules |
| 1 of ($*) | ‘any of them’ |
Here’s more coverage on strings in Yara’s conditions section: yara-strings
Now, we’re on to using the hex-string identifiers in our conditions section.
When it comes to using strings in Yara, we’re often focused on where the string is, rather than whether it is or not. And this offset often gives away the file. For example, all PE files start with the magic bytes ‘MZ’, which is composed of the hex string ‘4D 5A’. We can either search for these at the start of the file, or take a look at the 0th offset to see whether the file is a PE file or not. In my particular case, the file was an executable and did have the ‘4D 5A’ MZ header at the start.
So, using the ‘at’ command you can see if a particular string identifier at that offset or not. Here’s how:
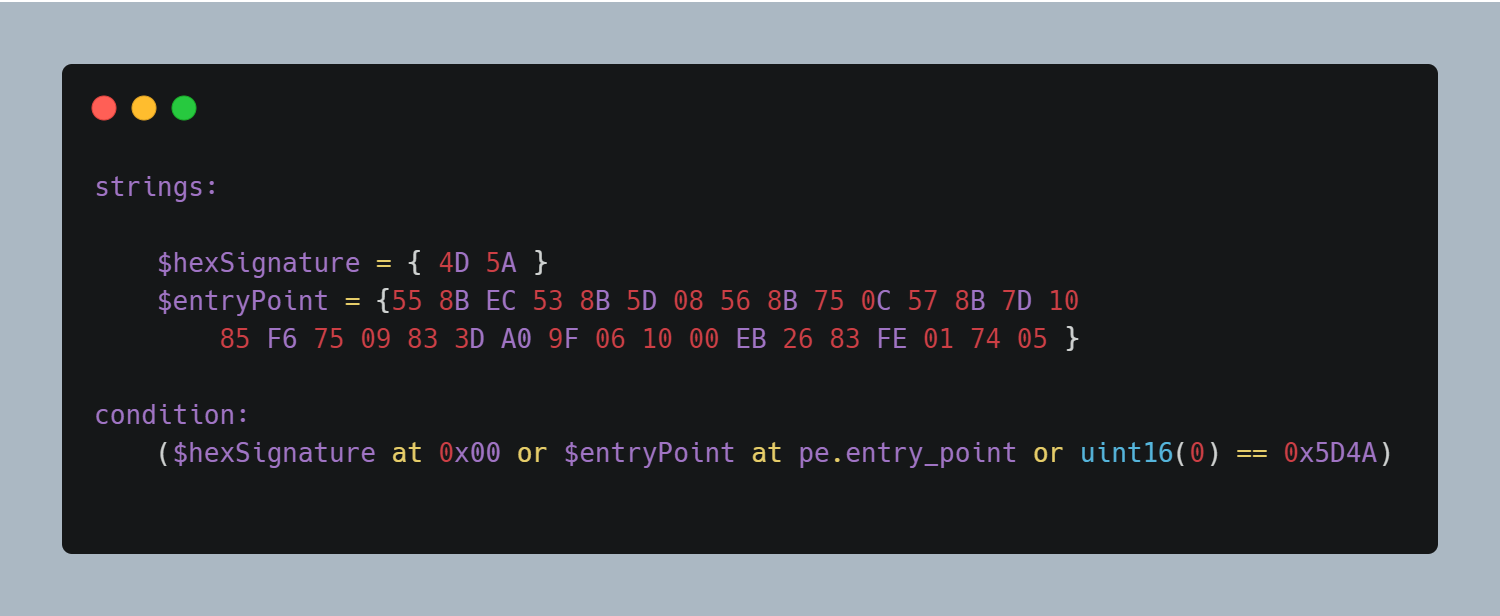
Here, I’m matching the MZ signature at the start of the file, 0th offset, or at 0x00. You can also utilize the intXX functions which can read 8, 16, and 32 bits signed integers from _
Finally, entrypoints. If the file is a Portable Executable (PE) or Executable and Linkable Format (ELF), this variable holds the raw offset of the executable’s entry point in case we are scanning a file. A typical use of this variable is to look for some pattern at the entry point to detect packers or simple file infectors.
If you check my rule, I’ve included it in a special format. It’s prepended by a ‘pe.’. This ‘pe’ is a module. Modules are extensions you can utilize to add to Yara’s own functionality. Here, the ‘pe’ module helps us look and scan for several attributes, identifiers, and key information in PE files. We can utilize the variable ‘entry_point’ from the PE module to match the value of our own file.
Get Some Malware!
Not everyone has access to malware repositories? Is that true? WELL, NO.
There’s loads of repositories on GitHub and several other websites which host malware. You need to take precautionary measures when using the malware for testing purposes. Especially make sure you don’t run that malware.
As far as my view is concerned, I love ‘theZoo’ on GitHub! Here’s a link to them: the-zoo
They’ve got an excellent collection of files and binaries you can make use of.
That’s it guys. Go back to the rule I posted at the start. You know everything in order to understand that Yara rule now. Feel free to refer back to the guide or Yara’s official documentation if you need help!
Here’s a link to Yara’s documentation if you need more help or guidance: yara-docs
That’s it for this blog guys. Have a safe few days and stay inside!