As a defender, having sound knowledge of how actors operate and the techniques they utilize is important. This should give us an idea about the path the attacker must’ve followed and we can continue on that trail until the last of the evidence. Anyways, we’ll be covering SSH bruteforcing in this article by setting up an OpenSSH server and then manually bruteforcing it using Hydra.
Now that you have a general idea as to what we’re going to do, let’s dive in. I’ve got two machines ready; one’s the attacker machine which is a Kali box with tools pre-installed on it. Other is the Windows 10 machine, which is going to host the OpenSSH server for me to bruteforce into.
First, let’s take a quick look at how you can setup the server locally.
Installing the OpenSSH Server Module
On Windows 10 (1803 and newer versions), Microsoft now provides support for the OpenSSH server by default. You can easily install the package as a feature and get started with your own server.
Head over to Settings. Under the ‘Apps & Features’ header, find the “Optional Features” option. There’s a chance you’re going to have the OpenSSH client installed here, but not the server. Install that by adding it as a feature - it shouldn’t take more than a few minutes.
By default, the binaries are installed in the path: %WINDIR%\System32\OpenSSH
If you wish to modify the configurations for the ‘sshd’ daemon, they’re available in the following directory: %ProgramData%\ssh
Though you might want to start the server first, in order to generate these files (with their default configurations).
Configuring the SSH Server
In order to setup the SSH server correctly, we need to open the standard port 22 or any other port you’d like for SSH communication. We can easily setup a new Firewall rule for the port using the following command in Powershell:
New-NetFirewallRule -Name sshd -DisplayName 'OpenSSH Server Agent' -Enabled True -Protocol TCP -Allow True -Direction Inbound -LocalPort 22
You can also use the GUI for the Windows Firewall and configure this setup under “Inbound Rules” in its advanced settings.
Next, you’d have to start the service. Use ‘services’ in the Run prompt and find the “OpenSSH SSH Server” service and set it’s startup as per your liking. I’ve set it up on a manual startup because I won’t be keeping this server open for long.

You can setup SSH public key authentication by creating the ‘.ssh’ folder along with the ‘authorized_keys’ file. Though I’ll be leaving it’s in-depth coverage out of the article - you can do so by creating the folder under your user and creating the file in that folder with strict ACL so only your Windows account can access it.
If you’d like to fingerprint your server’s host keys, you can do so by running the following command in a command prompt (uses ssh-keygen.exe):
for %f in (%ProgramData%\ssh\ssh_host_*_key) do @%WINDIR%\System32\OpenSSH\ssh-keygen.exe -l -f "%f"
This will generate a fingerprint for all host keys available in the ssh directory. Since fingerprints are based on the server’s own keys, they can be used by anyone to identify whether they’re connecting to the right host or not.
For the sshd_config file, I’ve kept the default configurations for now. It has settings which we can use to thwart brute-forcing attempts and we’ll check those out later.
Test to see if your SSH server is working out now. Since I’m not using public keys right now, I’ll stick to passwords. The password will actually be the Windows account password for the user you’re trying to log in as.
Here’s the command:
ssh {user}@{ssh-server-ip}
You’ll be verifying the fingerprint of the host before connecting to it. Next, you’ll also be prompted for the password. Once done, you’ll receive SSH access into the system.
SSH Password Brute-forcing using Hydra
Now to the little fun part. Hydra is a freely available tool on Kali Linux to bruteforce login credentials. We’ll be using it alongside a word dictionary (A set of default passwords) and see if our brute-force attempt works out.
You’ll come across two editions of Hydra - I’ll only be using the command line version to run this attack. Identify the IP of the SSH server - It’s 192.168.0.102 - the private IP for my own machine.
Hydra’s syntax isn’t too hard to follow, and you can use the following command to get started:
hydra -l user -p password -t 4 {IP} {protocol}
-l parameter takes in the name of the user which we’re going to use. The -p parameter takes in a single password. The -t is going to specify the number of threads which are going to be utilized or the number of tasks which should run in parallel. Next, just specify the IP and the protocol and you’re good to go (assuming SSH is available on port 22 - do some recon using nmap!)
While this is good, it’s not really practical to manually test every possible password. Wordlists are amazing for that very purpose and Hydra allows using them, using the -P parameter (just uppercased). A good wordlist already exists at /usr/share/wordlists/rockyou.txt.gz. I’ve decompressed it using the ‘gunzip’ command and will now be using it with Hydra. (Mind you, the brute-forcing step is to find out the strengths of the password and their uniqueness - for that very reason, my password wouldn’t have matched. Just for demonstration purposes, I’ve added my password in the file so we can easily brute-force it for now!).
Here’s the new command:
hydra -l root -P /usr/share/wordlists/rockyou.txt 192.168.0.102 -t 4 ssh
If you wish to brute-force usernames as well, we can also specify a wordlist for the user parameter using ‘-L’. Even the IP addresses can be in the form of a wordlist using the ‘-M’ parameter. The -e parameter reveals more options as you can test for null passwords, reversed usernames, or the same password (as the username) using nsr as the values. Lastly, if the target SSH server isn’t on port 22, you can specify a custom port using the ‘-s’ parameter.
For my own server, I’ll use the command:
hydra -l hasan -P ~/Desktop/dictionaries/rockyou.txt -t 4 192.168.0.102 ssh
Have a look at the results from this GIF:
Simply ssh into the server using the credentials you’ve just received!
‘SSH’ Logging and Configuration Changes
If you take a look at the total tries and the time it would’ve taken my Hydra command to exhaust itself, it’s quite long. Simply keeping strong and secure SSH passwords can help you defeat this approach to breaking through your SSH server.
Secondly, you can set the MaxAuthTries field to further slow down the attacker in brute-forcing. I’ve removed the hash from the start of the line and now reduced it down to 5 (I initially set it up as the one in the picture you’d see but lesser is better).
Thirdly, SSH logs are available in the ‘winevt’ directory under System32. Use the Event Viewer to view the Operational logs for the OpenSSH Server and you should see all these attempts listed there. Here, take a look:
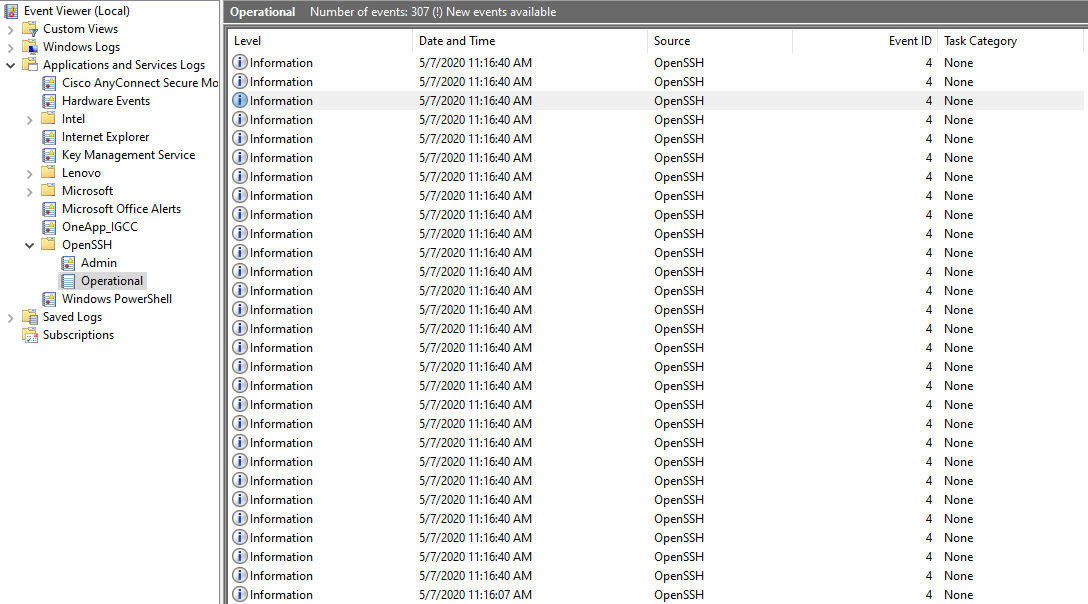
You can decide your next step if you know you’re under a bruteforce attack, by virtue of these logs or any other detection mechanism that you’ve setup. You can also improve the logging functionality in the configuration files for SSH. This should add in more information.
Conclusion
Hydra is fairly amazing at attempting brute-force attempts, but the outcomes of it can be quite disastrous for you. Ensure secure and safe SSH passwords at all times, which shouldn’t be a variant of the username, empty passwords, or commonly used English language phrases. Most of these can easily be broken and the credentials are breached.
Mind you, Hydra isn’t the only approach. There are dozens of other security solutions which you can use to break into SSH servers. Most common being - Metasploit modules and the NMAP Scripting Engine. You can also perform OSINT on this server using NMAP to extract more information (perhaps grab the banner or check out the port it’s actually using SSH on).
That’s it for today folks, see you in the next article.